
For connoisseurs of cinema, setting up a home theatre might be the ultimate dream come true. However, a minor hiccup poses itself as the struggle to soundproof the home theatre. This is necessary to ensure that your home theatre system is not annoying the living daylights out of your neighbors! Struggling with the nitty-gritties of soundproofing your home theater room is a common predicament. But there are many things you can do to soundproof your home theatre room for the benefit of both yourself and your neighbors.
While getting it done professionally is always an option, sometimes that can be a little heavy on the pockets. You can resolve this issue if you go the DIY route. There are quite a few things you can try. Mass-loading the walls, ceiling, and the floor is the most effective way to soundproof the room. Decoupling the walls might be slightly more effort-intensive, but it is worth it, too! Besides, you have to be attentive to the gaps in the room setup, especially around the door and window frames. None of the methods are very complicated. So, it would be a good idea to account for all the pros and cons before you take your pick. Let’s look at all the ways you could fix this issue.
Add mass to your walls
One of the primary ways to soundproof a home theater room is to fortify the walls. It might sound slightly like a dramatic battle strategy, but it is a very effective soundproofing procedure. All you need to do is grab some mass-loaded vinyl. If you aren’t familiar with it, it is just a roll of vinyl that contains little pieces of metal. Its fundamental function is to add to your walls’ existing mass, to make them exponentially more sound-impermeable.
A word of caution, though mass-enhancing vinyl might not sit well with the rest of your decor. If you value the aesthetics of your movie-watching environment, I’d suggest that you make this addition to the interiors of your drywalls. Or, you could always attach them outside if you are prepared to take the extra time and paint it over.
Mass Loaded Vinyl (MLV) applications
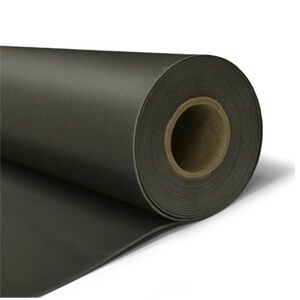 Mass is a critical component in sound control and works by simply stopping sound from vibrating through its structure. Mass Loaded Vinyl (MLV) is an effective material to use in lining soundproofing curtains or blankets.
At even just ½LB per sq ft, MLV can produce a 25 STC rating, and that is 1/16” thickness. You can get up to 35 STC by using 2lb per sq ft and 1/4” thickness; however, this is slightly more difficult to work with.
Decouple your walls
Decoupling the walls is another incredibly effective method, but you would need some basic skills up your sleeve for this one. While it’s nothing complicated, this might still prove to be trickier than simply mass-loading the walls. To make this work, you will have to take the drywall down. Install the decoupling mounts and, it would be advisable that you fill in the hollow with some sound-insulating material. This little trick works wonders! Finally, once you are all done with the interior of the walls, put up the drywall again. You’re set now!
Pay due attention to the ceiling and floor.
Something easy to overlook in the soundproofing process is the ceiling. While focusing on soundproofing the walls is very important, leaving the roof unattended might reduce your DIY system’s efficiency. The same goes for the floor. You could go for damping the floor and the ceiling because adding more mass to them will go a long way in soundproofing your home theatre system. The best part is that soundproofing material is available quite easily online; hence, you won’t have to toil too hard to get your hands on this material either!
As for the ceiling, you could completely remodel the existing system by tearing the old roof down and installing decoupling mounts. This will allow you to isolate the new ceiling joists from the older ones. Going for the strongest and most mass-loaded ceiling joists you can find will significantly enhance the effectiveness of your endeavor. Heavyweight insulation is a foolproof plan when it comes to DIY soundproofing. This method is a very efficient way of soundproofing your ceiling.
Fix sound escape routes
This might seem to be too obvious to include in this list, but paying enough attention to the slight gaps around your doors and windows is exceptionally pivotal to soundproofing your home theatre room perfectly. And probably because it seems so obvious, a lot of people tend to miss it entirely.
Sound sealing or weatherproofing for an air-tight seal
Airgaps need to be treated to ensure complete coverage and manage sound seeping in through the frame. It would be best if you did this on both sides and at the top of the frame. Weatherstripping requires little effort but, done properly, it’s an effective sound management method.
Most products use a peel-and-stick function. Surface preparation is required as the glue needs a clean area to ensure adhesion. An alcohol wash is not always required but is recommended. Installation should be done on the inner part of the frame.
You can use two methods for this:
Acoustic gasket
 This is a foam rubber composite material that is a hollow “D” shape. When compressed, the gasket seals off and prevents airflow. If the gap is wide enough, you may end up with an air pocket which is just as effective as a soundproofing method.
This indoor weather stripping with strong resilience after extrusion, good for anti-collision; great for preventing wind, dust, sound, cold, protecting the window and door, and reducing the abrasion and noise effectively on window/door while open and close.
Peel off the protective strip to expose the sticky side of the tape and then stick the gasket to the frame on all the edges as required.
Closed-cell foam
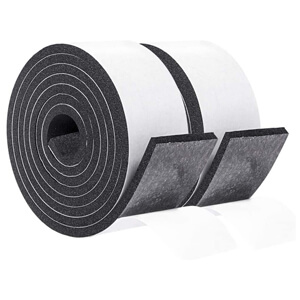 Acoustic treated foam is the most commonly used material for this. It is compressed between the inner door frame and the door itself, preventing sound from traveling through.
The foam seal tape is made from environmental protection material, CR foam, Neoprene, which has excellent sealing and resistance to deformation feature, toxic free, can be used from -50℃ to 150℃
Again peel-and-stick methods are commonly utilized for the application, which makes it easy to install.
Seal cracks and gaps around the frame
Air and sound may also leak through gaps around the frame, so sealing off this area is another “Must do” step in the sound management process.

Caulking in a layer of Green-glue around the frame will effectively address this issue. A large caulking gun is needed, and applying to bead around the entire frame is recommended.
Once you have established an air-tight seal around the frame and there are no gaps around the frame itself, you can look at other areas to address.
As for windows, you could do away with them entirely if you aren’t interested in investing in acoustic sealants. Another thing you could do is have someone replace your existing windows with double-glazed ones. Finally, the most easy-to-do solution would be to fashion a window plug out of wood and fit it over the window.
With doors, all you need to do is replace them with more mass-loaded material. You could always invest in an expensive soundproof door, but it might not be the most affordable thing there is out there. This is also when you should look into sealing the jambs around your doors don’t worry; you will find plenty of DIY kits online. Adding some curtains might be just the finishing touch you need regarding aesthetics and the soundproofing system.
Add sound absorbents to your setup.
By far, the simplest way to achieve a quick fix would be to get yourself one of those sound-absorbing acoustic panels simply. These definitely will not be very effective as a permanent solution, but it’ll work just fine for a while! If you don’t want to shell out an extravagant amount over the placement of the panels on your walls, you could place them close to the speakers and the like. As you have probably guessed, this won’t be a rather surface fix than the more permanent methods. So, if making a paradigm shift in the design of your home theater room is not feasible for you, this could be just what you need.
The basic principle you will be employing is to ensure that the sound from your home theater does not escape. Hypothetically, shutting the door of the room while attending to a private phone call might seem adequate. But you can’t possibly expect the same levels of effectiveness when the sound is being emitted from a home theatre setup, which is specifically built to improve sound clarity. Sound can permeate through the tiniest of cracks and openings. If you have invested generously in your sound system, there’s a good possibility that a lot of the sound is seeping out and possibly even causing some amount of distress to your neighbors. DIY soundproofing will vary in quality based on the resources you have at your disposal. However, sure the time and you put into soundproofing your home theatre room will be a brilliant investment.
Acoustic foam panels
The best acoustic foam panels are effective at basically stopping echo resonating from hard, flat surfaces. This does lend to managing some of the sound coming through into an area.
Installation requires the use of adhesion and covering the entire area with the foam panels. The typical result is a 20%-30% reduction which is only slightly noticeable.
You should use this method in conjunction with other methods to improve effectiveness, but as a stand-alone soundproofing method, this may be a bit disappointing.
What to do next
- Bookmark
Save this page as a bookmark for reference during the project. - Depending on which methods you plan on starting out with you should go through to the “next step”
In this article, I’ve outlined the basics of these processes but I’ve gone into depth in other articles including material and tool requirements, installation processes and best practice tips. To see this click on the “next step” link. - Sound treatment material
I’ve listed the best products for the job in the “next step”. You can use any of the brands listed as I’ve only linked to the best. You can even see some product comparisons. Make sure you get a pack size or dimensions that will give you the coverage you need. - Check you have the tools required
I have mentioned the tools and equipment you’ll need in the “next step”. If you want to be sure you have everything you can see them there. - Set aside time for the job
Once you have everything, call a friend or two to help. Having a few friends around to share the workload and a few laughs will make it a lot easier and fun.
Good luck and happy Soundproof a Home Theater!